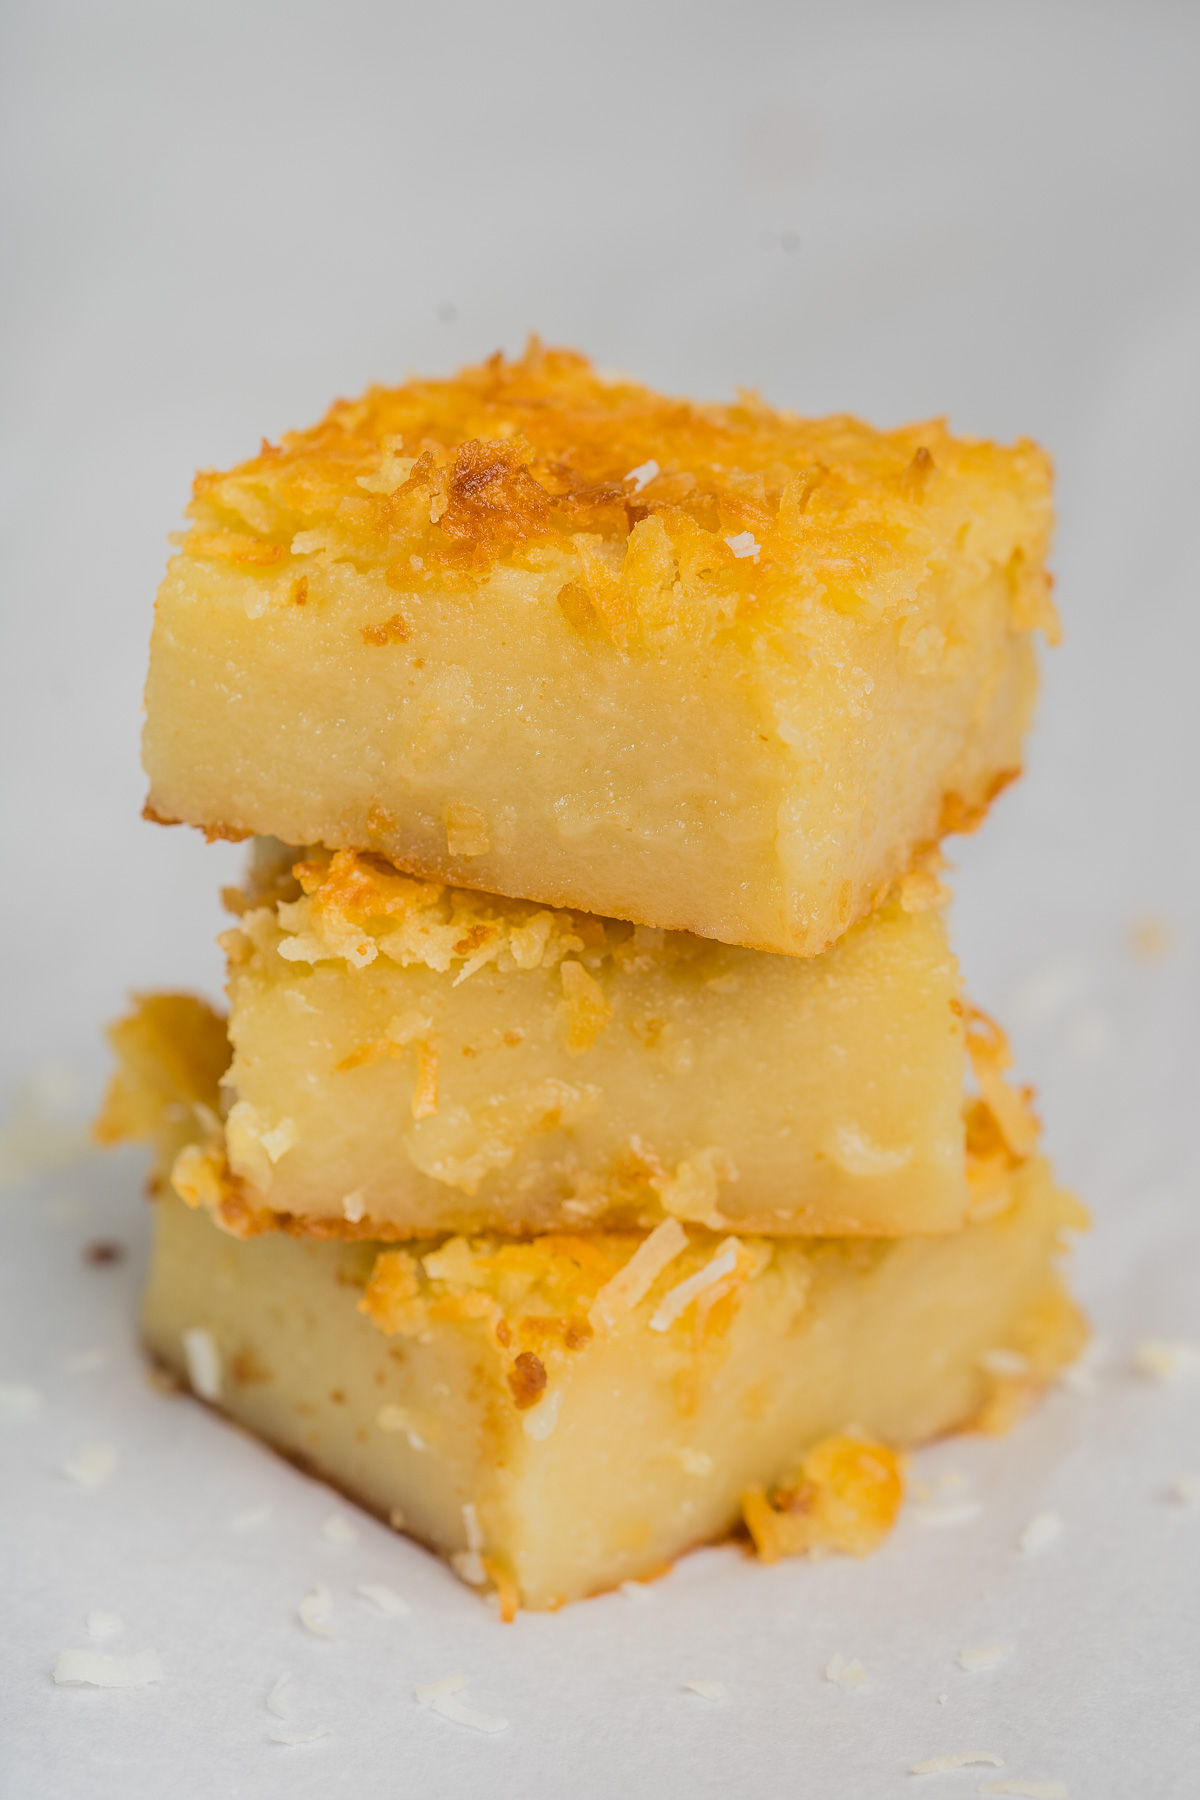
Butter mochi is a classic Hawaiian treat that can be found everywhere in Hawaii, and for good reason. Butter mochi is addictingly soft and chewy with hints of vanilla and coconut flavor. Luckily for those of us who don’t happen to live in Hawaii, butter mochi can also be found outside of Hawaii, and with this easy butter mochi recipe, you can bring this delightful treat into your own kitchen!

Contents
What is butter mochi?
While on a family vacation in Hawaii, I discovered a local treat for the first time at a farmer’s market called butter mochi, and I was instantly hooked. Not so great for my waistband, but I, nor my tastebuds, were complaining. Butter mochi is like a fusion between a brownie and Japanese mochi. The end result is a deliciously sweet treat that’s soft and chewy on the inside like mochi, with a slight crispy crust like a brownie. It has been compared to a lot of Southeast Asian dishes, like Filipino bibingka or cassava cake.
Butter mochi is made by baking Mochiko flour, butter, coconut milk, eggs, and sugar on a flat 9″x13″ baking pan. Its a no frills dessert, and its beauty is in its simplicity. Everyone has their own Hawaiian butter mochi recipe, so there are endless variations and you can dress it up with shredded coconut flakes, matcha powder, cocoa powder and chocolate chips or enjoy it in its original dressed down and simple state. It will be delicious either way!
What is Mochiko flour?
Mochiko is the key ingredient in this recipe and is what gives butter mochi its stretchy and chewy texture. Mochiko means “mochi flour” in Japanese, but it is also known as sweet rice flour or glutinous rice flour, despite not having any gluten in it, meaning butter mochi is actually gluten free!
After trying different brands, I’ve found the best results with Blue Star Mochiko Sweet Rice Flour by Koda Farms, which is what is most commonly used in Hawaii. American grocery stores may not carry this product, so your best bet to get Mochiko is by visiting your local Asian grocery stores or Japanese market. If you can’t find Koda Farms at your local grocery stores or asian markets, grab these online.

Pro tips for best results
Keep ingredients at room temperature
It’s easier to mix the ingredients and create a uniformly smooth batter when they’re all the same temperature. Leave the refrigerated ingredients (eggs, butter, and milk) out to get to room temperature before mixing them all together.
Mix the batter
Make sure to mix the batter well to achieve a smooth consistency in the batter and eliminate any small lumps.
Grease the pan
Butter mochi is usually baked in a 9″x13″ pan, then cut into smaller squares for serving, so it’s important to make sure to fully grease or butter your pan before pouring your batter in. You can also line the prepared pan with parchment paper, however I prefer just making sure I grease my pan.
Tap out air bubbles
Air bubbles in the batter can occur for a number of reasons and would result in a slightly more airy butter mochi. To achieve a more dense, chewy Hawaiian butter mochi, after you have poured the batter into a pan, give the pan a few good taps on the counter before putting it in the oven. Tapping the pan allows the butter mochi batter to settle and helps to push air pockets out.
Let it cool
If you’re anything like me, after waiting 30-60+ minutes of baking time, you’re ready to have a bite right when anything comes out of the oven. It doesn’t matter if it’s a cake, a brownie, or a muffin. However, in the case of the butter mochi, it does pay off to have a little bit of patience before digging in. Butter mochi is usually cut into smaller squares before serving and the knife may stick to the butter mochi if it’s straight out of the oven, so letting it cool will make it easier to cut. Using a plastic knife will also help decrease sticking.
Edges!
Butter mochi is traditionally baked in a flat 9″x13″ pan and there’s definitely nothing wrong with that. That said, I love the crunchy edges from the sides and corners and I feel like a lot of people do too! So I really like using the All-Edges baking pan for my butter mochi recipe. That way, every chewy treat has a crispy edge to enjoy too! The All-Edges baking pan is slightly smaller at 9″x12″ so if you decide to use it, you may want to slightly decrease the recipe or you’ll have some extra batter that you can use in another pan or muffin pan.
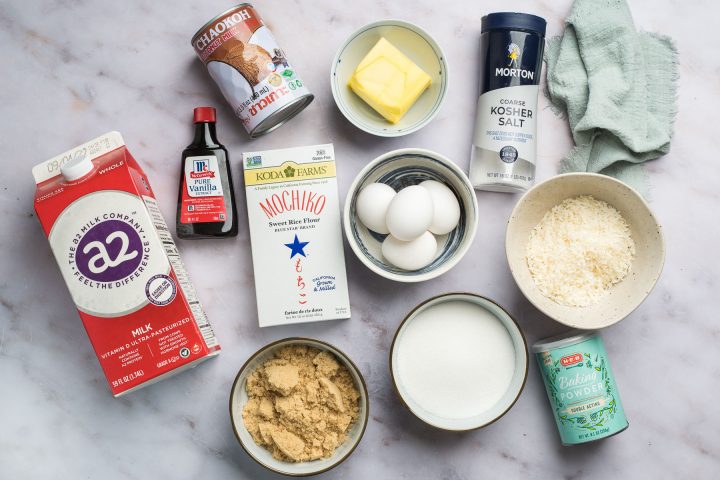
Ingredients
- 1 box of Mochiko sweet rice flour
- 1 cup of granulated white sugar (200 grams)
- 1 cup light brown sugar (200 grams)
- 1 teaspoon baking powder
- ¼ teaspoon salt
- 1 can of coconut milk (13½ oz)
- 2 cups of whole milk, at room temperature
- ½ cup of unsalted butter, melted
- 4 large eggs, at room temperature
- 2 teaspoons vanilla extract
- ½ cup of unsweetened, shredded coconut flakes (optional)
Equipment
- Mixing bowls
- Measuring spoons/cups
- Whisk
- Spatula or wooden spoon
- 9″x13″ baking pan
- Stand mixer (optional)
- Parchment paper (optional)

How to make it
- Pre-heat oven to 350 degrees Fahrenheit.
- Butter or grease a 9″x13″ baking pan.
- In a large bowl, mix dry ingredients together: Mochiko flour, sugar, baking powder, salt.
- In a separate medium bowl, start mixing some wet ingredients together: milk, eggs, vanilla extract.
- Slowly pour the wet ingredients into the dry ingredients, gently stirring and mixing as you pour.
- Add coconut milk next, and then melted butter, gently stirring and mixing as you pour.
- Mix well until there are no lumps and the butter mochi batter has a smooth, even consistency.
- Pour the batter into the prepared 9″x13″ baking pan.
- Tap the pan against a tabletop or countertop a couple of times to remove air bubbles.
- Optional: sprinkle some coconut flakes on top of the mixture after tapping.
- Bake at 350 degrees Fahrenheit for 60 mins on middle oven rack.
- Remove and let cool completely on wire rack to room temperature before cutting into 2-inch pieces and serving
- Optional: Top with powdered sugar, whipped cream, or your favorite fruits!
Storing
I recommend storing them in an airtight container. They’ll keep for 2-3 days at room temperature, about 1 week in the refrigerator, and a couple months in the freezer.
Reheating
You can just reheat butter mochi in the microwave, but my favorite method is to do a combo of the microwave and toaster oven.
I warm them up in the microwave for 20-30 seconds (slightly longer if frozen), then reheat them in the toaster oven at 350 degrees Fahrenheit for 5 minutes to re-crisp the outside layer while the inside stays soft and chewy.
Variations
Coming soon!

FAQs
Can I use regular rice flour instead of Mochiko?
I would recommend against using regular rice flour instead of Mochiko flour. Regular rice flour will not result in the desired chewy mochi texture. If you have both options available, please try the recipe with Mochiko flour first.
Can I use evaporated milk instead of regular milk?
You can substitute evaporated milk for regular milk with a slight adjustment. Since evaporated milk is milk that’s been heated to remove about half of its water content, you’ll want to add it back in. So you’ll want to use equal amounts of evaporated milk and water. For example, if the recipe calls for 2 cups of regular milk, you can substitute 1 cup of evaporated milk and 1 cup of water.
Can I use any fat percentage of milk?
You can use any fat percent milk without much appreciable difference in the results.
Should I use unsalted or salted butter?
I prefer to use unsalted butter in my recipes.
Can this be frozen?
Yes, you can definitely freeze butter mochi for future enjoyment! They’ll keep for a couple months and you can reheat them with my method mentioned above.
Butter Mochi Recipe
Equipment
- Mixing bowls
- Measuring spoons/cups
- Spatula or wooden spoon
- 9″x13″ baking pan
- Stand mixer (optional)
- Parchment paper (optional)
Ingredients
- 1 box Mochiko sweet rice flour
- 1 cup granulated white sugar (200 grams)
- 1 cup light brown sugar (200 grams)
- 1 teaspoon baking powder
- ¼ teaspoon salt
- 1 can coconut milk (13½ oz)
- 2 cups whole milk (at room temperature)
- ½ cup unsalted butter (melted)
- 4 large eggs (at room temperature)
- 2 teaspoons vanilla extract
- ½ cup unsweetened shredded coconut flakes (optional)
Instructions
- Pre-heat oven to 350 degrees Fahrenheit.
- Butter or grease a 9″x13″ baking pan.
- In a large bowl, mix dry ingredients together: Mochiko flour, sugar, baking powder, salt.
- In a separate medium bowl, start mixing some wet ingredients together: milk, eggs, vanilla extract.
- Slowly pour the wet ingredients into the dry ingredients, gently stirring and mixing as you pour.
- Add coconut milk next, and then melted butter, gently stirring and mixing as you pour.
- Mix well until there are no lumps and the butter mochi batter has a smooth, even consistency.
- Pour the batter into the prepared 9″x13″ baking pan.
- Tap the pan against a tabletop or countertop a couple of times to remove air bubbles.Optional: sprinkle some coconut flakes on top of the mixture after tapping.
- Bake at 350 degrees Fahrenheit for 60 mins on middle oven rack.
- Remove and let cool completely on wire rack to room temperature before cutting into 2-inch pieces and servingOptional: Top with powdered sugar, whipped cream, or your favorite fruits!


")
